
gonna need a cleaning supply expert on this one. =P

I'M SO JDM, I HAVE SARS
Joined: Apr 2005
Posts: 4,537
Likes: 0
From: badalandbad
this is thanks to goob! 
Originally Posted by RedGoober4life
Wash
What you should have:
one or two buckets
hose (optional, read on to see why)
GOOD car wash soap
Lambswool/Chenile washmit
Microfiber towel prefered to dry (absorber is crap, target sells a huge Microfiber towel for drying that is quite nice)
Have you ever watched a normal person wash a car? They start with the front bumper, then the hood, then the doors, then the roof, then the rear bumper, trunklid, etc. Please slap them.
When you take a shower you don't wash your crotch and then go to your arms and legs, so why wash your car like that?
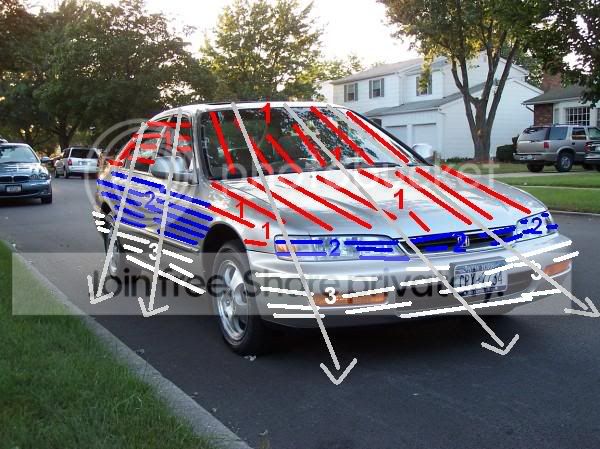
Start with the Roof, windows, hood, trunklid, upper fenders. Rinse the wash mit after every panel or every half of a large panel. Then do the upper doors, lower fenders, vertical part of the trunklid, and the headlights. Always end with the dirtiest part of the car: bumpers, lower doors below bumpstrips. Work DOWNWARD. This pictures may or may not help explain this. Also, the lines provide a bit of a guide to the wash mit movement (linear, please).

And of course rinse the suds off, but I generally wait to rinse the whole car unless it's very warm and sunny.
Dry
Now you'll probably notice that there is more water then you want on the paint. Your towel is going to get sopping wet before you know it.
The trick of the trade, and I'm sure enough people here know it, is to take the sprayer nozel off the paint like so:
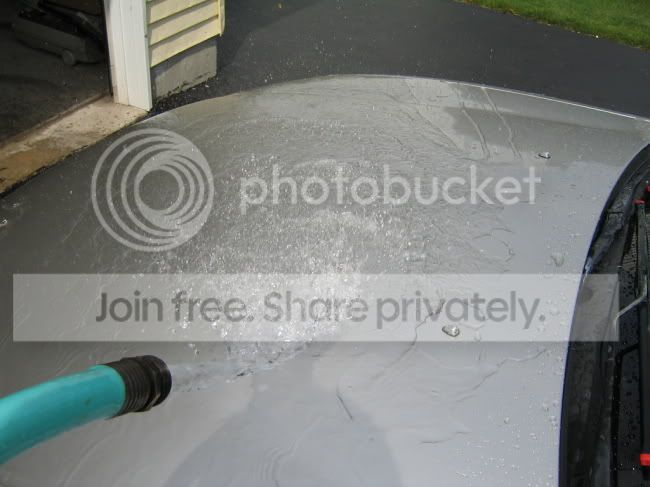
What happens? The water sheets because water is wonderfully cohesive. It's not perfect but it reduces the amount you have to wring out the drying towel from a few times to maybe not at all.
Washes that I like in order from like most to like least:
Duragloss (carquest)
MeguiarsNXT wash (pepboys)
Meguiars Gold Class (target has it cheap)
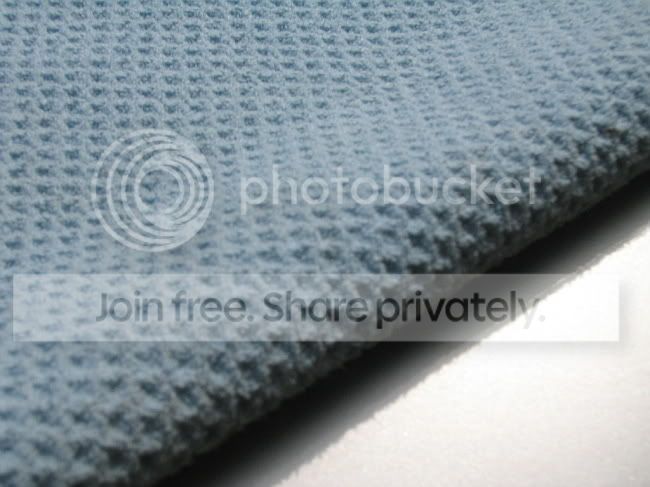
You've probably heard a great hype around microfiber WAFFLE WEAVE drying towels. Honestly I think the majority of the time they are overpriced. You can find a Meguiars branded one at Pepboys that looks very nice, and is comparable in price to the VROOM branded target regular MF drying towels. Whatever you prefer. They'll both work.
Comparison (top is target($7) big plush microfiber drying towel, bottom is a pakshak waffle weave microfiber($18))

Whatever, I'm not buying anymore drying towels over $10 but if you have the money go ahead. It won't hurt.
But Corey why do you take so much time to wash the car?
The dirt from the lower portions of the car can and will scratch your paint. Everybody has seen swirls. What people do not know is that on close inspection they really are light, crossthatched scratches caused by improper washing (for the most part). The only reason they look circular is how the sun is catched by them. Look at them and you will see that they are usually pretty continuous.
So you wash the dirty portions last to help prevent this. The combination of the right wash order, the nap of the wash mit (as opposed to the nearly flat surface of a sponge), the good wash solution, and the microfiber drying towel should help prevent sratches.
Quick detailers/quick waxes
This step is really up to you, but if anybody thinks I wax my car everytime I go to a meet you're mistaken. It only looks just freshly waxed because I always use a quick detailer after I wash my car. I don't know, it gives it a slick feel, and it really makes it look a lot better than just a wash.
My favorite at the moment is Mother's FX Synwax Spraywax. It's quick and easy. It says you can use it wet but I prefer to use it dry (just seems to work better). Try it either way and do what you like more.

Tomorrow I'll cover wheels and tires. Basically, what do you all want covered?
Please don't quote since I may read this and make changes to wording to ease readability.
What you should have:
one or two buckets
hose (optional, read on to see why)
GOOD car wash soap
Lambswool/Chenile washmit
Microfiber towel prefered to dry (absorber is crap, target sells a huge Microfiber towel for drying that is quite nice)
Have you ever watched a normal person wash a car? They start with the front bumper, then the hood, then the doors, then the roof, then the rear bumper, trunklid, etc. Please slap them.
When you take a shower you don't wash your crotch and then go to your arms and legs, so why wash your car like that?
Start with the Roof, windows, hood, trunklid, upper fenders. Rinse the wash mit after every panel or every half of a large panel. Then do the upper doors, lower fenders, vertical part of the trunklid, and the headlights. Always end with the dirtiest part of the car: bumpers, lower doors below bumpstrips. Work DOWNWARD. This pictures may or may not help explain this. Also, the lines provide a bit of a guide to the wash mit movement (linear, please).
And of course rinse the suds off, but I generally wait to rinse the whole car unless it's very warm and sunny.
Dry
Now you'll probably notice that there is more water then you want on the paint. Your towel is going to get sopping wet before you know it.
The trick of the trade, and I'm sure enough people here know it, is to take the sprayer nozel off the paint like so:
What happens? The water sheets because water is wonderfully cohesive. It's not perfect but it reduces the amount you have to wring out the drying towel from a few times to maybe not at all.
Washes that I like in order from like most to like least:
Duragloss (carquest)
MeguiarsNXT wash (pepboys)
Meguiars Gold Class (target has it cheap)
You've probably heard a great hype around microfiber WAFFLE WEAVE drying towels. Honestly I think the majority of the time they are overpriced. You can find a Meguiars branded one at Pepboys that looks very nice, and is comparable in price to the VROOM branded target regular MF drying towels. Whatever you prefer. They'll both work.
Comparison (top is target($7) big plush microfiber drying towel, bottom is a pakshak waffle weave microfiber($18))
Whatever, I'm not buying anymore drying towels over $10 but if you have the money go ahead. It won't hurt.
But Corey why do you take so much time to wash the car?
The dirt from the lower portions of the car can and will scratch your paint. Everybody has seen swirls. What people do not know is that on close inspection they really are light, crossthatched scratches caused by improper washing (for the most part). The only reason they look circular is how the sun is catched by them. Look at them and you will see that they are usually pretty continuous.
So you wash the dirty portions last to help prevent this. The combination of the right wash order, the nap of the wash mit (as opposed to the nearly flat surface of a sponge), the good wash solution, and the microfiber drying towel should help prevent sratches.
Quick detailers/quick waxes
This step is really up to you, but if anybody thinks I wax my car everytime I go to a meet you're mistaken. It only looks just freshly waxed because I always use a quick detailer after I wash my car. I don't know, it gives it a slick feel, and it really makes it look a lot better than just a wash.
My favorite at the moment is Mother's FX Synwax Spraywax. It's quick and easy. It says you can use it wet but I prefer to use it dry (just seems to work better). Try it either way and do what you like more.
Tomorrow I'll cover wheels and tires. Basically, what do you all want covered?
Please don't quote since I may read this and make changes to wording to ease readability.
I'M SO JDM, I HAVE SARS
Joined: Apr 2005
Posts: 4,537
Likes: 0
From: badalandbad
part2
I would write my own, but he did an awesome job on the write up--just an amazing detailer across the board.[/quote]
Originally posted by GSRstilez
This guide will assist greatly in your road to re-finishing your dull, scratched, swirled, and/or oxidized lighting such as tail lights, corner lights, or headlights. Now, you can vary which products you use, but I hope you see the results I achieved with the ones present. What you will need is:
-Spray Bottle (Home Depot)
-Your Favorite Car Wash (Pep Boys or PAC)
-3 Towels (I prefer Microfiber from PAC)
-2 Applicators (I prefer Microfiber from PAC)
-A Aluminum Polish (I chose Mother�s from Wal-Mart)
AND/OR
-A Paint Polish (Like Meguiar�s #82 Swirl Free Polish from PAC)
-A Rubber Sanding Block (Ace Hardware)
-1500 Grit Wet-Sanding Papers (Ace Hardware)
-A Nylon Bristled Brush (Wal-Mart)
-A Protectant (I chose the Klasse Twins for their durability from PAC)

First off, you want to start by cleaning the lighting surface and inspecting it for damage. In the spray bottle, put 1oz of car wash and the rest water (low pressure), then tighten the bottle and shake up to mix. I used this mixture along with a microfiber towel to clean the surface. The best way to check for damage is to hold the surface into a bright light allowing the sourced lighting to reflect off what you are working with, in this case a tail light. This amplifies imperfections, and in this case, swirls were the main problem. However, there were a couple scratches in which I eventually removed.

Notice the haze over the suface...They are actually swirls
After you inspect, you could do 1 of 2 things. If your surface is pretty much flawless, I�d go straight to the polishing step, but since I had a couple scratches, the next step was to wetsand the lights down to level the surface. I took a sheet of 1500 grit wet-sanding paper and soaked it in a bucket with 1 gal water:1 oz car wash for 20 minutes. Next, I cut to fit the paper and mounted it on the sanding block. I then sprayed the taillight generously with the soap:water mixture to lubricate and began wet sanding. I went side to side which I found easiest using medium presure. DO NOT DO IT IN CIRCLES or PUSH HARD. I sanded for about 20 seconds each section (see pic) to level out the surface. I then sprayed down the light and wiped clean with my microfiber to inspect for a level surface. After inspecting, I finished up the remaining areas and went to the polishing stage.


For the polishing stage, you want to remember this. Unlike paint, you need to let the polish do all the work here, not the heat you are producing. Plastic is much weaker to heat than a clearcoat is and it will burn easily. With this said, I applied the Mother�s Aluminum Polish generously on the surface. I then took my Makita Rotary w/ polishing pad at the LOWEST speed and polished til there was only a slight haze of product, then wiped clean with a new microfiber. I inspected the surface and repeated to insure a full polishing out of all the defects. Repeat if necessary. Now, if you just have a PC, then use a polishing pad on a low setting allowing the polish to do the work, just like I stated above. By hand, you will need to start off with a paint polish like Meguiar�s #82 SFP or #83 DACP applied with a cotton or microfiber applicator in the same way you wet-sanded, side to side. You don�t want to press to hard, remember, let the polish do the work. Work it until you have a light haze of product, then remove with your microfiber. Follow this up with an aluminum polish using the same technique to bring the lights to a deep, defect free gloss. With the detailing brush, you will want to gently brush any polish from the raised lettering in �Koito� or the other words so there is no white residue.


After re-inspecting the surface under the light, you will want to protect your lighting from future dulling or oxidizing. The only way to protect them from scratching and swirling is to touch up your car-washing skills. Now for protecting, I chose the Klasse twins for their remarkable durability. I applied AIOx2 to insure all the oils from the polishes were removed, then SGx1.


Left is untouched, Right is after this full process

High Gloss and Defect Free!
This concludes the lighting restoration guide. Remember, this will work on any hard plastic lighting, but don�t attempt this on soft plastic windows. Any questions, post them back here. Good Luck!
This guide will assist greatly in your road to re-finishing your dull, scratched, swirled, and/or oxidized lighting such as tail lights, corner lights, or headlights. Now, you can vary which products you use, but I hope you see the results I achieved with the ones present. What you will need is:
-Spray Bottle (Home Depot)
-Your Favorite Car Wash (Pep Boys or PAC)
-3 Towels (I prefer Microfiber from PAC)
-2 Applicators (I prefer Microfiber from PAC)
-A Aluminum Polish (I chose Mother�s from Wal-Mart)
AND/OR
-A Paint Polish (Like Meguiar�s #82 Swirl Free Polish from PAC)
-A Rubber Sanding Block (Ace Hardware)
-1500 Grit Wet-Sanding Papers (Ace Hardware)
-A Nylon Bristled Brush (Wal-Mart)
-A Protectant (I chose the Klasse Twins for their durability from PAC)
First off, you want to start by cleaning the lighting surface and inspecting it for damage. In the spray bottle, put 1oz of car wash and the rest water (low pressure), then tighten the bottle and shake up to mix. I used this mixture along with a microfiber towel to clean the surface. The best way to check for damage is to hold the surface into a bright light allowing the sourced lighting to reflect off what you are working with, in this case a tail light. This amplifies imperfections, and in this case, swirls were the main problem. However, there were a couple scratches in which I eventually removed.
Notice the haze over the suface...They are actually swirls
After you inspect, you could do 1 of 2 things. If your surface is pretty much flawless, I�d go straight to the polishing step, but since I had a couple scratches, the next step was to wetsand the lights down to level the surface. I took a sheet of 1500 grit wet-sanding paper and soaked it in a bucket with 1 gal water:1 oz car wash for 20 minutes. Next, I cut to fit the paper and mounted it on the sanding block. I then sprayed the taillight generously with the soap:water mixture to lubricate and began wet sanding. I went side to side which I found easiest using medium presure. DO NOT DO IT IN CIRCLES or PUSH HARD. I sanded for about 20 seconds each section (see pic) to level out the surface. I then sprayed down the light and wiped clean with my microfiber to inspect for a level surface. After inspecting, I finished up the remaining areas and went to the polishing stage.
For the polishing stage, you want to remember this. Unlike paint, you need to let the polish do all the work here, not the heat you are producing. Plastic is much weaker to heat than a clearcoat is and it will burn easily. With this said, I applied the Mother�s Aluminum Polish generously on the surface. I then took my Makita Rotary w/ polishing pad at the LOWEST speed and polished til there was only a slight haze of product, then wiped clean with a new microfiber. I inspected the surface and repeated to insure a full polishing out of all the defects. Repeat if necessary. Now, if you just have a PC, then use a polishing pad on a low setting allowing the polish to do the work, just like I stated above. By hand, you will need to start off with a paint polish like Meguiar�s #82 SFP or #83 DACP applied with a cotton or microfiber applicator in the same way you wet-sanded, side to side. You don�t want to press to hard, remember, let the polish do the work. Work it until you have a light haze of product, then remove with your microfiber. Follow this up with an aluminum polish using the same technique to bring the lights to a deep, defect free gloss. With the detailing brush, you will want to gently brush any polish from the raised lettering in �Koito� or the other words so there is no white residue.
After re-inspecting the surface under the light, you will want to protect your lighting from future dulling or oxidizing. The only way to protect them from scratching and swirling is to touch up your car-washing skills. Now for protecting, I chose the Klasse twins for their remarkable durability. I applied AIOx2 to insure all the oils from the polishes were removed, then SGx1.
Left is untouched, Right is after this full process
High Gloss and Defect Free!
This concludes the lighting restoration guide. Remember, this will work on any hard plastic lighting, but don�t attempt this on soft plastic windows. Any questions, post them back here. Good Luck!

