
Projector Halo LED Replacement


Thread Starter
Senior Member
Joined: Aug 2003
Posts: 154
Likes: 0
From: Ontario
OK, I know many folk have had problems with Halo projector lights burning out on them, and since they're right in the housing of the lamp, replacing them may seem difficult, but it's actually quite easy...
What you'll need.
Soldering Iron
8 LEDs (Choose whatever colour you like)
8 resistors
an oven
Flat head screwdriver or other type of prying device
Philips screwdriver (if you can get a small one, that would be best for some of the inner screws)
Wire Cutters
Electrical tape
xacto knife
First take your lights out. Remove the front bumper and grill, then your headlights (so many forums and guides show how to do this)
Set your oven to about 275F
REMOVE ALL BULBS!
Clean headlamp
Wrap the headlamp in Tinfoil (prevents anything from dripping or falling onto the oven burner)

Put the lamp in for about 10 - 15 minutes (I've got Sonar lights, and 13 minutes was perfect)
While this is going on you may want to start soldering the LEDs and Resistors. Solder the resistor to the positive terminal (the longer one) on the LED. Wrap each terminal seperately with electrical tape but don't overdo it, or it'll be too thick to fit properly. Once each of the 4 lights is wrapped, use a small piece of tape to hold them together right below the bulb. Gently spread them apart, make sure no areas of bare terminals are touching one another.
By now the light should be cooked.
Take the lamp out of the oven
Keep the oven mits or gloves on, grab a flathead screwdriver and start working it between the lens and back housing of the lamp, going all the way around the lamp. You'll have to work fairly quickly, as the sealant seems to cool fairly quickly (around 5 minutes). Pull the pieces apart as much as you can (the wires connecting to the halos will only alow for so much... it's a pain in the ass trying to get the wires back through the rubber cap seal later.)
Once the pieces are apart, grab the philips screwdriver and remove the inner chrome housing from the lens. There's only one screw on the sonar models, there may be more on others.

Remove the halos by unscrewing them from behind (same philips screwdriver or smaller)
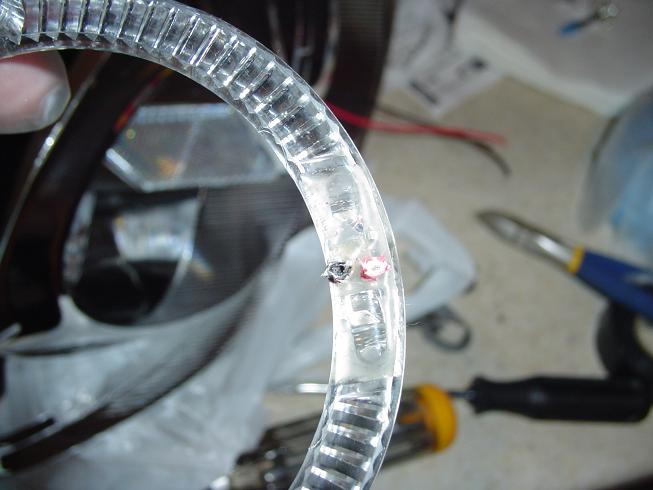
Cut the wires as close to the halo as you can., but leave enough so that a pair of pliers could grab the wire, only a few milimeters)
As you can see, the lovely folks at sonar glued the LEDs right into the halos.
So.... put them back in the oven at 275 for about 5-7 minutes. Take them out and use a pair of pliers or the wire cutters to grab the LED wires and pull... they should pop right out. I found that this method melted the glue, but also turned it a light amber colour. Most of the amber colour comes out with the lights, but I can't notice it after reinstalling. Just don't freak out. Make sure most, if not all of the glue comes out, you can pick at it while it's hot with the wire cutters
Position the wrapped LEDs into the chrome lens, and fit the bulbs inside the halo, and screw them back in. Solder the halo wires appropriately (black to negative, red to positive) and wrap with electrical tape. Examine the wires to see if there are any bare spots or fraying. If there are, wrap them with tape as well.

Check the chrome housing for fingerprints, dirt etc and clean as needed. Reattach it to the lens.

Now, here's the reattaching/resealing problem. You can do it in many ways. While your working and have removed the chrome housing and halos, you could put the back end back into the oven to melt the glue/sealant again and peel it off with a screwdriver. This can be very time consuming, but could be for the best. If you decide to do it this way, just reseal everything using clear silicone sealant.
The other method is the heat gun method (which I used) heat up the sealant using a heatgun and gradually pressing the parts back together. HOWEVER, there is the chance you can overheat and melt the back housing, which I slightly did in one place. If you choose to do it this way, just take your time and don't overheat anything. It was quite easy and I got both resealed in about 10-20 minutes. I went over the sealing area with some clear silicone to ensure a good seal.
After that, let the silicone sit for about 10-20 minutes, and reinstall the lights in the car.
What you'll need.
Soldering Iron
8 LEDs (Choose whatever colour you like)
8 resistors
an oven
Flat head screwdriver or other type of prying device
Philips screwdriver (if you can get a small one, that would be best for some of the inner screws)
Wire Cutters
Electrical tape
xacto knife
First take your lights out. Remove the front bumper and grill, then your headlights (so many forums and guides show how to do this)
Set your oven to about 275F
REMOVE ALL BULBS!
Clean headlamp
Wrap the headlamp in Tinfoil (prevents anything from dripping or falling onto the oven burner)
Put the lamp in for about 10 - 15 minutes (I've got Sonar lights, and 13 minutes was perfect)
While this is going on you may want to start soldering the LEDs and Resistors. Solder the resistor to the positive terminal (the longer one) on the LED. Wrap each terminal seperately with electrical tape but don't overdo it, or it'll be too thick to fit properly. Once each of the 4 lights is wrapped, use a small piece of tape to hold them together right below the bulb. Gently spread them apart, make sure no areas of bare terminals are touching one another.
By now the light should be cooked.
Take the lamp out of the oven
Keep the oven mits or gloves on, grab a flathead screwdriver and start working it between the lens and back housing of the lamp, going all the way around the lamp. You'll have to work fairly quickly, as the sealant seems to cool fairly quickly (around 5 minutes). Pull the pieces apart as much as you can (the wires connecting to the halos will only alow for so much... it's a pain in the ass trying to get the wires back through the rubber cap seal later.)
Once the pieces are apart, grab the philips screwdriver and remove the inner chrome housing from the lens. There's only one screw on the sonar models, there may be more on others.
Remove the halos by unscrewing them from behind (same philips screwdriver or smaller)
Cut the wires as close to the halo as you can., but leave enough so that a pair of pliers could grab the wire, only a few milimeters)
As you can see, the lovely folks at sonar glued the LEDs right into the halos.
So.... put them back in the oven at 275 for about 5-7 minutes. Take them out and use a pair of pliers or the wire cutters to grab the LED wires and pull... they should pop right out. I found that this method melted the glue, but also turned it a light amber colour. Most of the amber colour comes out with the lights, but I can't notice it after reinstalling. Just don't freak out. Make sure most, if not all of the glue comes out, you can pick at it while it's hot with the wire cutters
Position the wrapped LEDs into the chrome lens, and fit the bulbs inside the halo, and screw them back in. Solder the halo wires appropriately (black to negative, red to positive) and wrap with electrical tape. Examine the wires to see if there are any bare spots or fraying. If there are, wrap them with tape as well.
Check the chrome housing for fingerprints, dirt etc and clean as needed. Reattach it to the lens.
Now, here's the reattaching/resealing problem. You can do it in many ways. While your working and have removed the chrome housing and halos, you could put the back end back into the oven to melt the glue/sealant again and peel it off with a screwdriver. This can be very time consuming, but could be for the best. If you decide to do it this way, just reseal everything using clear silicone sealant.
The other method is the heat gun method (which I used) heat up the sealant using a heatgun and gradually pressing the parts back together. HOWEVER, there is the chance you can overheat and melt the back housing, which I slightly did in one place. If you choose to do it this way, just take your time and don't overheat anything. It was quite easy and I got both resealed in about 10-20 minutes. I went over the sealing area with some clear silicone to ensure a good seal.
After that, let the silicone sit for about 10-20 minutes, and reinstall the lights in the car.


Junior Member
Joined: Sep 2008
Posts: 2
Likes: 0
i used the leds from radioshack.. bright whites 2pcs for 2 dollars.. heres a post of a link on how to do it
soldering the leds:
http://www.geocities.com/jvxdriver/eagle_eyes.htm
installing it with aux switch
http://www.hondacivicforum.com/forum...ad.php?t=61798
soldering the leds:
http://www.geocities.com/jvxdriver/eagle_eyes.htm
installing it with aux switch
http://www.hondacivicforum.com/forum...ad.php?t=61798